Starlink Mini RV setups have become the go-to boondocking solution in 2026, but the real question isn’t whether the Starlink Mini can get you online — it’s whether your battery bank can keep it online. The Mini is small, cheap to buy, and easy to run on 12V DC, which is why it’s replaced the Standard dish for most RVers.
But its power draw numbers get reported inconsistently across the web, and that gap matters when you’re sizing a battery bank for a week of dry camping. This review breaks down the real Starlink Mini RV power draw, what battery and solar setup you need to run it all day, and how to get it online in your rig in under 10 minutes.
Table of Contents
Why the Starlink Mini RV Setup Leads in 2026
The Starlink Mini now sells for $199–249 (down from its original $599 launch price), weighs about 2.4–3 lbs without the kickstand, and measures roughly 298.5 x 259 x 38.5 mm — small enough to stash in a cabinet when you’re not using it. It ships with a built-in Wi-Fi 5 router covering up to 1,200 sq. ft., a kickstand, a pipe adapter for permanent roof mounts, and a DC power cable.
That last part is the reason it’s taken over from the Standard dish for RV use: the Mini is designed to run natively on 12V DC power, so you can wire it directly into your RV’s electrical system without an inverter. That eliminates one of the biggest sources of wasted power in a satellite internet setup — inverter conversion losses can eat 10-15% of your energy before it even reaches the dish.
In the U.S., the Mini only works on Starlink’s Roam plans: Roam 50GB runs about $50/month, and Roam Unlimited runs about $165/month. It won’t work on Residential or fixed-address plans.
Starlink Mini Power Draw: The Real Numbers
This is where reviews disagree, so here’s the range you should actually plan around:
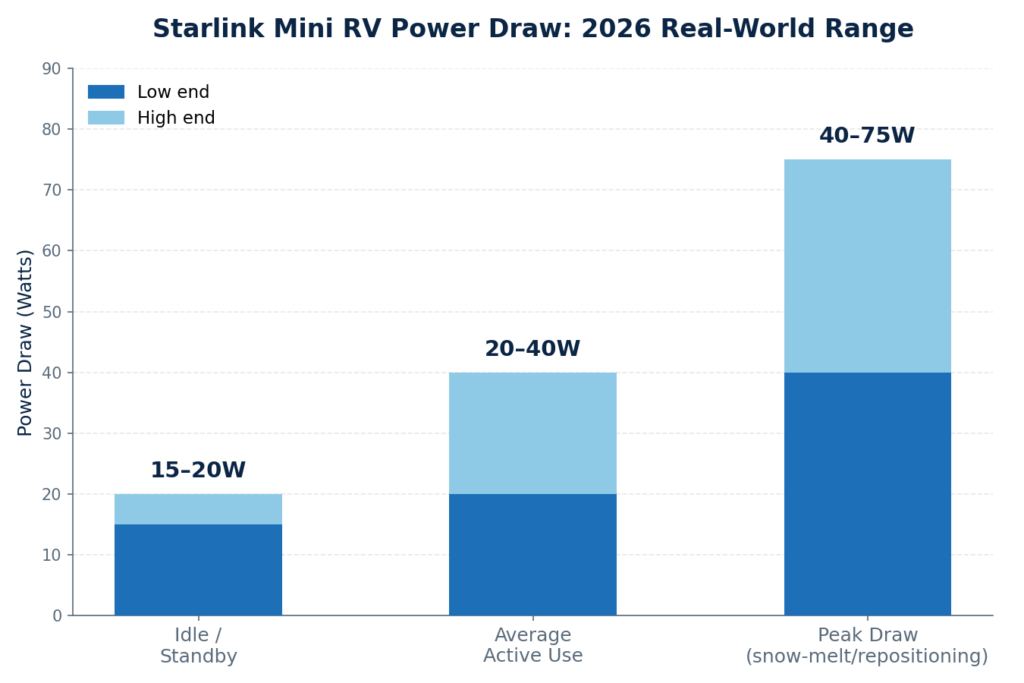
- Idle/standby: roughly 15–20W
- Average active use: 20–40W (this is the figure SpaceX cites officially)
- Peak draw: up to 40–75W during heavy use, cold-weather snow-melt mode, or when the dish is repositioning to find a stronger signal
The spread exists because ambient temperature, network congestion, and whether snow-melt mode is active all shift the number. If you’re budgeting a battery bank, don’t plan around the 20W “average” figure alone — plan around a realistic all-day blend that accounts for peak draw during work hours and low draw overnight.
Rule of thumb for daily energy use: at an average of 40W running 12-16 hours a day (typical for someone working remotely from the rig), the Mini pulls roughly 480-640 watt-hours per day. That’s a modest load compared to running an AC unit or induction cooktop, but it adds up over a multi-day boondocking stretch if you’re not accounting for it in your solar budget.
How Much Battery and Solar You Actually Need
For most RVers, the Mini is not the appliance that breaks your power budget — but it’s not free either. Here’s how to size around it:
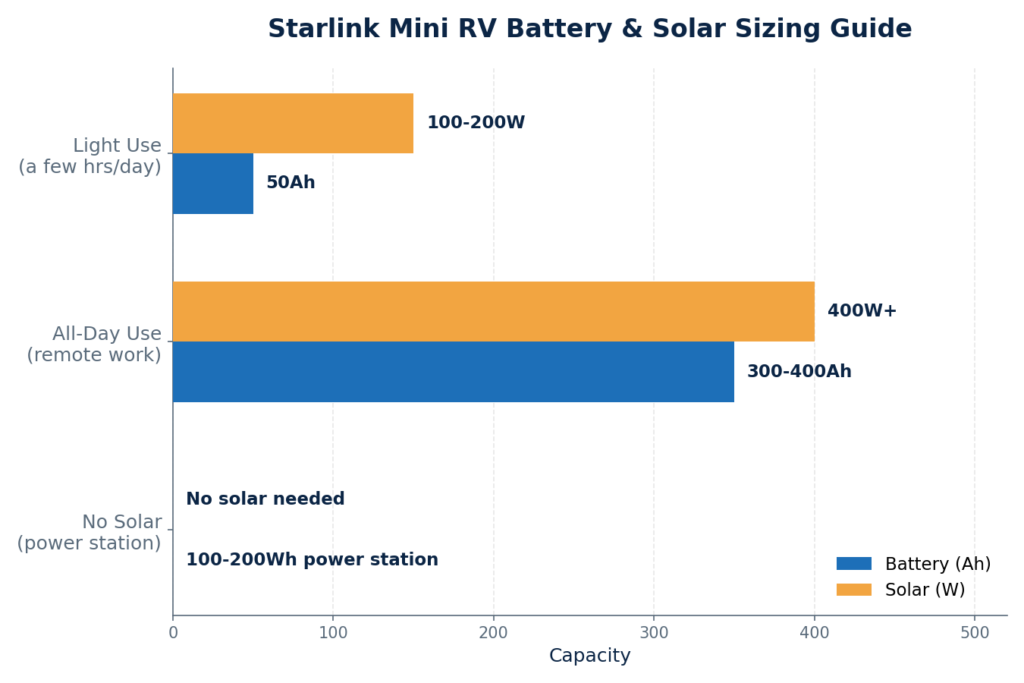
- Light use (a few hours a day, casual browsing): a 50Ah lithium battery paired with 100-200W of solar comfortably keeps the Mini running indefinitely, assuming average sun.
- All-day use (remote work, streaming, video calls): pair the Mini with a 300-400Ah lithium battery bank and 400W+ of solar if it’s running alongside your fridge, lighting, and other 12V loads.
- No solar, generator-dependent: the Mini’s 12V DC draw is low enough that even a small 100-200Wh portable power station will run it for most of a day between charges, making it a reasonable backup option for short trips.
If you’re already running a properly sized RV solar and battery system for a fridge, lighting, and device charging, adding the Mini typically adds a manageable increment rather than requiring you to rebuild your whole setup — but it’s worth re-running the math rather than assuming your existing margin covers it, especially in winter when snow-melt mode kicks the draw toward the high end.
Setup: From Box to Online in Under 10 Minutes
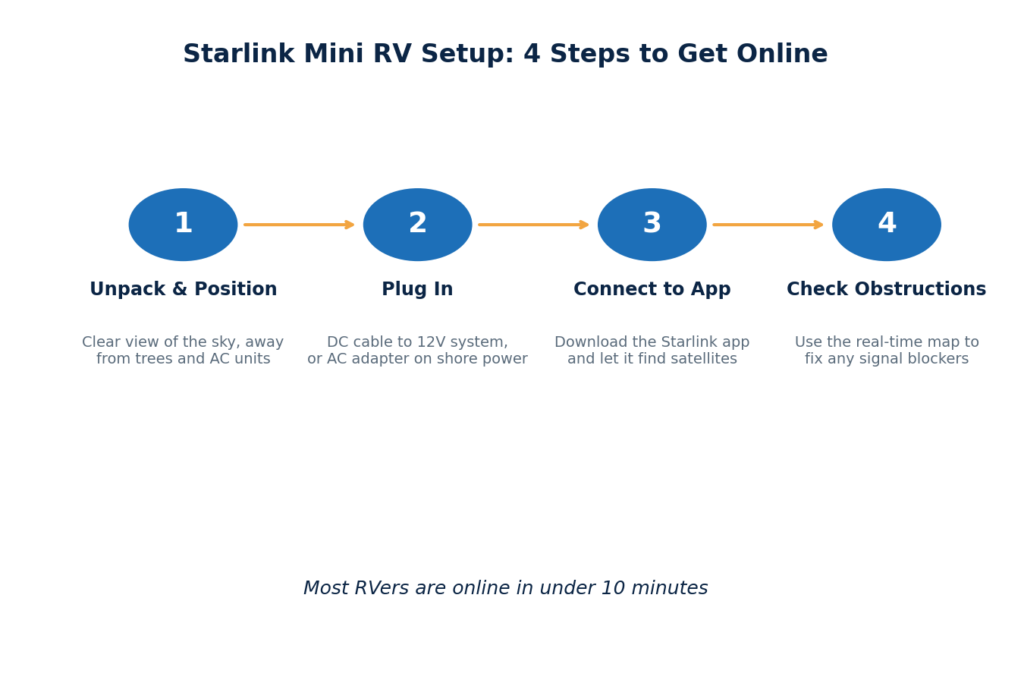
The Mini’s setup process is deliberately simple:
- Unpack and position — set it on the included kickstand somewhere with a clear view of the sky, away from trees, awnings, and AC units.
- Plug in — connect the DC power cable if you’re wiring it into your RV’s 12V system, or use the included AC adapter if you’re running off shore power.
- Connect to the app — download the Starlink app, follow the prompts, and let it search for satellites.
- Check for obstructions — the app shows a real-time obstruction map. If your signal is degraded, it’ll tell you exactly which direction is blocked so you can reposition.
For a semi-permanent setup, many RVers mount the Mini to the roof using the included pipe adapter and run the DC cable through an existing entry point, which avoids re-deploying it at every stop.
Starlink Mini vs Standard: Which One for Your Rig
Starlink Mini RV: $199–249, 20-40W average power draw, about 2.4-3 lbs, 80-150 Mbps typical download (up to 187 Mbps peak), Roam plans only. Best for boondocking, portability, and lean solar setups.
Starlink Standard: $349, 75-100W active power draw, significantly heavier, up to 400 Mbps on fixed plans (about 260 Mbps on Roam), works on Residential or Roam plans. Best for permanent roof mounts where you want maximum speed and have the electrical capacity to spare.
If your rig has a lean solar setup or you move frequently and want to hand-carry the dish, the Mini is the better fit. If you have a robust electrical system and want the fastest possible speeds for a permanent roof mount, the Standard is still the performance leader — you’re trading roughly 2-3x the power draw for meaningfully faster throughput.
Common Power and Signal Mistakes RVers Make
- Sizing the battery bank around “average” draw only. Peak draw during snow-melt or heavy use can be nearly double the average figure — budget for the peak, not just the average.
- Running it through an inverter unnecessarily. If your RV has a 12V DC circuit available, wire the Mini directly rather than routing through an inverter and losing 10-15% to conversion.
- Ignoring obstruction warnings. A partially blocked view of the sky doesn’t just slow your connection — it can make the dish work harder to maintain signal, increasing power draw.
- Forgetting it’s Roam-only. If you’re moving between an RV and a fixed home setup, remember the Mini won’t activate on a Residential plan in the U.S. — you need Roam.
The Bottom Line
The Starlink Mini RV’sreal-world power draw runs 20-40W on average with peaks up to 75W — modest compared to most 12V appliances, but enough to matter when you’re sizing a boondocking battery bank. Pair it with at least a 50Ah battery and 100-200W of solar for light use, or fold it into a 300-400Ah/400W+ system if it’s running all day alongside your other loads.
Wire it directly to 12V DC if your rig supports it, skip the inverter, and check the obstruction map before you assume your signal problem is a hardware problem. If you’re planning a boondocking trip and haven’t sized your battery bank around your full 12V load list yet — Starlink included — that’s the next thing to run the numbers on before you leave pavement behind.